Showing posts with label Spyder MR3. Show all posts

Friday, April 18, 2008

Spyder Paintball Team Bad Company Travels Abroad For Gold


Bad Company takes first place using Spyder paintball markers in Aruba

Bad Company. Spyder PaintballBaldwin Park, CA - Tom Cole, captain of Spyder sponsored paintball team Bad Company setup a plan for 2008 to take his team global. Looking to expose his guys to international turf the team plans to make stops in South America, Europe, Malaysia, and Australia with a South African tournament already in the books. The paintball team's last stop at the CSP Aruba Madness event April 12-13th proved successful with Bad Company taking home the top prize in the Open Division.

"We are excited to represent Spyder on an international level, and look forward to sharing our paintball experiences with the many regions we plan to visit. We thank our sponsor Spyder for providing us this opportunity, including the Spyder RSX paintball markers and gear that lead us to victory in Aruba" says Tom Cole, captain of Bad Company.

Next up for the boys, a trip to sunny Brazil where they will compete against South America's finest hoping to add another victory to their international record. The CSP Brazil stop takes place May 24-25th.

Bad Company. Spyder Paintball

Bad Company has been sponsored by Spyder since 2001 playing throughout the United States in the NPPL, PSP, and scenario circuits. This year the paintball team has split in to three with one group staying in the US to compete, the international squad, and BC Army, the scenario team which competes with the Spyder MR Series markers.

Bad Company paintball mix


Stay tuned for future updates on BC's travels right here at http://www.spyder.tv/

Wednesday, January 9, 2008

Are Spider Paintball Guns Good Markers?


That really depends. Most Spider paintball guns are good for people that only play paintball every month or so.

One of the things that is bad about spider paintball markers is that they are Very UNaccurate. The velocity consistency is HORRIBLE on most of them and they break very easily.

The good things about them is that they are cheap paintball gun and a few of them are pretty nice for scenario games. If I was to get a spider gun, I would probably get an Spider MR3 Paintball Gun.

The spider markers also use a good amount of air from your tank. That's not very good for people that are using just about any air system.

If you have a spider paintball gun I would highly recommend that you upgrade it to about a $250-400 gun — Spider VS3 paintball gun

How to get free paintball stuff. You have to know about free Target $500 gift card.

Wednesday, January 2, 2008

Spyder MR3 Paintball Gun Schematics


Spyder MR3 Paintball Gun Schematics


Spyder MR3 paintball marker's parts list

01Barrel Plug
03Ball Stopper
09O-Ring #015 80D
10CValve Spring
11Cup Seal Guide
12Cup Seal
13Valve Pin
14Valve Body
14AValve Body Roll Pin
15Valve Body Screw
16M5 x 12 Screw w/ washer
19AStriker O-Ring
20Barrel O-Ring
25Striker Spring
26AStriker Buffer
37BFilter O-Ring
37CAir Filter
49Trigger Pin
49BSear Roll Pin (Small)
49CTouch Switch Roll Pins
243MR3 Wire Harness
252MR3 Vertical / C/A Adapter
253MR3 Vertical / C/A to Hose Adapter
254MR3 Reservoir Adapter Plug
257MR3 Bolt Pin
258MR3 Dovetail Drop Forward
260MR3 Striker Plug
261MR3 Dovetail Bottom-Line ASA
262MR3 Quick Disconnect Pin
266MR3 Snap T-Knob
267MR3 Snap T-Clip
268MR3 Snap T-Spring
269MR3 Snap Rail Cover
270MR3 Grip Panels
272MR3 Touch Switch w/ Wire Harness
273MR3 Blade Trigger
276MR3 Parts Kit
283MR3 Male STD / Female Metric
290MR3 Disconnect Hose 6.25” (black)
294M4 x 8 Screw w/ Washer
296MR3 Velocity Adjuster w/ Spring Guide
297MR3 Velocity Adjuster O-Ring
298Trigger Set Screw
320MR3 10” Barrel
321MR3 Feed Neck
322MR3 Shroud
323MR3 Rifle Sight
324MR3 Rifle Sight Screw
325MR3 Receiver
326MR3 Delrin Bolt
327MR3 Fore Grip Handle
328MR3 Sight Rail
329MR3 Eye / Detent Cover
330MR3 Trigger Frame
331MR3 Circuit Board
332MR3 Miltary Adjustable Stock
333MR3 Military Adjustable Stock Screw
334Flat M4 x 8 Screw
2608SDrop Forward Lock Screw
E24ABattery Harness
JE12Sear
JE18AStriker Bolt
JE18CCoil Set
JE18ECoil Set Screw
JE29Circuit Board Screw
JE31EESP Sear Spring
JE10159.6v Rechargeable Battery
JE1024A/C Charger - 110v

Spyder MR3 Manual
Spyder MR3 Paintball Gun and Compressed Air Tank
Spyder MR3 Paintball Gun Electronics and Settings
Spyder MR3 Paintball Guns Battery Charging
Spyder MR3 Paintball Marker Velocity Adjustment
Spyder MR3 Disassemble Reassemble and Cleaning Internals
Spyder MR3 T-Cocking Removal
Spyder MR3 Anti Chop Eyes
Spyder MR3 Cup Seal Removal

How to get free paintball stuff. You have to know about free Target $500 gift card.

Spyder MR3 Cup Seal Removal


STEP BY STEP CUP SEAL ACCESS
The following steps will provide easy accessto the Cup Seal (#12).
The sign of a worn out Cup Seal (#12) is the presence of CO2/Compressed Air leaking down the barrel.

STEP 1 Loosen the Disconnect Hose (#290) from the collar.
STEP 2 Loosen the 2 set screws M5x12 (#16).
STEP 3 Remove the Fore Grip Handle (#327).
STEP 4 Loosen the 2 set screws M5x12 (#16).
STEP 5 Remove the Shroud (#322).
Once the steps have been completed, this will allow the Reservoir Plug (#254) to slide out with the Valve Spring (#10C), Cup Seal Guide (#11), Cup Seal (#12) and Valve Pin (#13).

HELPFUL TIP: Please note how the parts are removed for easy reassembly.


Spyder MR3 Cup Seal Removal

HELPFUL HINTS
Always remove the Air Tank before any disassembly of your Spyder MR3 paintball marker. Do not remove the Valve Body (#14) unless specific Valve Body repairs are needed. If needed, remove Valve Body with a long, softtipped object such as the eraser end of a pencil. Do not remove the Valve Body with a screwdriver as it will damage the Valve Body and cause air leaks. NOTE: Valve Body (#15) screw must be removed prior to taking out the Valve Body.

Spyder MR3 Manual
Spyder MR3 Paintball Gun and Compressed Air Tank
Spyder MR3 Paintball Gun Electronics and Settings
Spyder MR3 Paintball Guns Battery Charging
Spyder MR3 Paintball Marker Velocity Adjustment
Spyder MR3 Disassemble Reassemble and Cleaning Internals
Spyder MR3 T-Cocking Removal
Spyder MR3 Anti Chop Eyes
Spyder MR3 Paintball Gun Schematics

How to get free paintball stuff. You have to know about free Target $500 gift card.

Sunday, December 16, 2007

Spyder MR3 Anti Chop Eyes


The Anti Chop Eyes help prevent chopping paint by not allowing the marker to fire until a paintball is in front of the Venturi Bolt. The Eyes transmit a beam across the inside of the breech. The Circuit Board is preset from the factory and does not need to be adjusted or altered. If the Eyes are ON and do not see each other when firing your marker, you will have to clean the Eyes.

Spyder MR3 Cleaning The Anti Chop Eyes
Using a squeegee or swab thru the breech should clean the Eyes enough for the beams to detect each other. Another way is to use an aerosol can of air thru the breech to remove paint or dirt from the Eyes. To thoroughly clean the Eyes remove all M4 x 8 Screws (#294) (including the lower screw not pictured which holds the Feed Neck), the Eye / Detent Cover (#329) and the Feed Neck (#321) using an allen wrench. Once the M4 x 8 Screws (#294), Eye / Detent Cover (#329), and Feed Neck (#321) are removed, precede with a soft pinch to remove the Eye Wire Harness (#243) from the receiver. Remove all dirt or paint that is blocking the Eyes and causing it to malfunction.

Spyder MR3 Anti Chop Eyes

HELPFUL TIP: Please note how the parts are removed for easy reassembly.

IMPORTANT: Cleaning the Eyes often will help reduce dirt, paint or oil residue that blocks the Eyes from seeing each other.

NOTE: Never attempt to rush the cleaning process or you can pinch the wires and cause the marker to malfunction with the Eye Mode ON. Take precaution not to over tighten the M4 x 8 Screw (#294) or this can lead stripping the head.

CHANGING THE BALL DETENTS
Experiencing paint rolling through the barrel, can be related to small diameter of paintballs or the lost of a ball detent(s). When removing the Eye / Detent Cover (#329) and Feed Neck (#321) the Ball Detents (#03) will become accessable to be cleaned or replaced.

HELPFUL TIP: Please note how the parts are removed for easy reassembly.

NOTE: Take precaution not to over tighten the M4 x 8 (#294) or this can lead to stripping the head.

Spyder MR3 Manual
Spyder MR3 Paintball Gun and Compressed Air Tank
Spyder MR3 Paintball Gun Electronics and Settings
Spyder MR3 Paintball Guns Battery Charging
Spyder MR3 Paintball Marker Velocity Adjustment
Spyder MR3 Disassemble Reassemble and Cleaning Internals
Spyder MR3 T-Cocking Removal
Spyder MR3 Cup Seal Removal
Spyder MR3 Paintball Gun Schematics

How to get free paintball stuff. You have to know about free Target $500 gift card.

Spyder MR3 T-Cocking Removal


Spyder MR3 Paintball Marker T-Cocking Removal

STEP 1 Remove Flat M4 x 8 Screw (#334).
STEP 2 Slide the Snap Rail Cover (#269) toward the rear of the marker.
STEP 3 Remove Snap T-Knob (#266).
STEP 4 Remove the Snap T-Clip (#267). NOTE: Be careful while removing the Snap T-Springs (#268) as the tension may cause them to fly off.
HELPFUL TIP: Please note how the parts are removed for easy reassembly.


Spyder MR3 Paintball Marker T-Cocking Removal

Spyder MR3 Paintball Marker Trigger Adjustment

Adjusting the Top Trigger Set Screw (#298) clockwise will swing the Trigger (#273) closer the Touch Switch (#272) which will lessen the trigger gap. NOTE: Adjusting the Trigger Set Screw (#298) counter-clockwise will increase the trigger gap.

Adjusting the lower Trigger Set Screw (#298) clockwise will shorten the Trigger (#273) stroke to the Touch Switch (#272) this will increase Trigger (#273) sensitivity. NOTE: Adjusting the Trigger Set Screw (#298) counter-clockwise will decrease the Trigger (#273) sensitivity.


Spyder MR3 Paintball Marker T-Cocking Removal

Spyder MR3 Manual
Spyder MR3 Paintball Gun and Compressed Air Tank
Spyder MR3 Paintball Gun Electronics and Settings
Spyder MR3 Paintball Guns Battery Charging
Spyder MR3 Paintball Marker Velocity Adjustment
Spyder MR3 Disassemble Reassemble and Cleaning Internals
Spyder MR3 Anti Chop Eyes
Spyder MR3 Cup Seal Removal
Spyder MR3 Paintball Gun Schematics

How to get free paintball stuff. You have to know about free Target $500 gift card.

Spyder MR3 Disassemble Reassemble and Cleaning Internals


TROUBLESHOOTING
ONE OR MORE OF THE FOLLOWING MAY CAUSE RECOCKING RELATED PROBLEMS:
The pressure in the tank is too low. In some cases, the weather can affect the liquid in the tank
and not cause it not to expand into carbon dioxide gas.
Spyder MR3 paintball marker needs lubrication.
Venturi Bolt (#326) needs to be cleaned.
The Striker O-ring (#19A) is damaged. Replace with new Kingman or Kingman-approved O-ring. NOTE: The O-ring (#19) cannot be substituted by a tank O-ring or an #09 O-ring.
Need to clean Barrel and upper chamber of the Receiver (#325).
Paintballs may be defective (i.e. expired, odd shape, etc.)
After ball breaks in Barrel or chamber, remove all parts from upper chamber of Receiver, wipe parts clean, and reassemble parts into Receiver. Also make sure to clean the Barrel with a squeegee.

DISASSEMBLE REAR INTERNALS
STEP 1 Remove Quick Disconnect Pin (#262). NOTE: Place a finger over the Striker Plug (#260) before removing the Quick Disconnect Pin (#262)
STEP 2 Remove the Striker Plug (#262) Main Spring (#25) Striker Buffer (#26A).
STEP 3 Remove the following items at the same time. Striker Bolt (#JE18A) and the Delrin Venturi Blot (#326).

HELPFUL TIP: Please note how the parts are removed for easy reassembly.

REASSEMBLE REAR INTERNALS
When reassembling the Delrin Venturi Bolt (#326) and Striker Bolt (#JE18A) the circuit board must be powered ON with the Eyes OFF. Join the Delrin Venturi Bolt (#326) and Striker Bolt (#JE18A) together entering the back end of the Receiver (#325). Simultaneously pull the Blade Trigger (#273) and apply pressure behind the Delrin Venturi Bolt (#326) to allow reentry of both parts. Reinstall the Striker Buffer (#26A), Striker Spring (#25) Striker Plug (#260) and press in the Quick Disconnect Pin (#262) to lock down all back internals.

HELPFUL TIP: When the back internals are removed it would be wise to clean any dirt or paint from inside the Receiver (#325) with a stick swab or cable squeegee. Wipe the Delrin Venturi Bolt (#326) with a rag or paper towel. The Striker O-Ring (#19A) will need to be oiled periodically. Kingman recommends that each time the back internals are removed the Striker O-Ring (#19A) should be oiled.

IMPORTANT: Never oil the Delrin Venturi Bolt (#326). This will swell the bolt and cause cocking problems. Striker Buffer (#26A) should be installed behind the Striker Bolt (#JE18A) to ensure proper functioning.

WARNING: Never attempt to remove the Spyder MR3 paintball markers internals while the CO2 / Compressed Air bottle is attached. Make sure to remove all paintballs and loader before disassembling the marker.

Spyder MR3 Manual
Spyder MR3 Paintball Gun and Compressed Air Tank
Spyder MR3 Paintball Gun Electronics and Settings
Spyder MR3 Paintball Guns Battery Charging
Spyder MR3 Paintball Marker Velocity Adjustment
Spyder MR3 T-Cocking Removal
Spyder MR3 Anti Chop Eyes
Spyder MR3 Cup Seal Removal
Spyder MR3 Paintball Gun Schematics

How to get free paintball stuff. You have to know about free Target $500 gift card.

Spyder MR3 Paintball Marker Velocity Adjustment


VELOCITY ADJUSTMENT INCREASE/DECREASE
To increase your velocity FPS (Feet per second) using the allen wrench turn the Velocity Adjuster (#296) clockwise.
To decrease your velocity FPS (Feet per second) using the allen wrench turn the Velocity Adjuster (#296) counterclockwise.
NOTE: Velocity Adjuster w/Spring Guide (#296) doesn’t remove from the rear of the Striker Plug (#260).

Spyder MR3 Paintball Marker Velocity Adjustment

WARNING

  • The recommended Velocity speed should be no greater then 300fps. Not doing so can cause serious injury if the velocity is dangerously high.
  • Spyder MR3 paintball markers are not intended to shoot any person less then 25 feet.
  • Never point a loaded Spyder MR3 paintball marker at any person who is not wearing the proper face protection.
  • Never at any time should you look down the barrel when the marker is loaded or not.
  • Using a paintball marker outside a non designated paintball field can be illegal, and is subject to law enforcement penalties if property damage is caused by the user.

SPYDER MR3 PAINTBALL MARKER SHOULDER STOCK INSTALLATION

Place the Shoulder Stock (#332) on the back end upper section of the Receiver (#325). Once the Shoulder Stock is in place tighten the Set Screw (#16) to secure the stock to the body of the marker.
The Set Screw (#16) is located on the right side of the receiver.

SPYDER MR3 PAINTBALL MARKER SHOULDER STOCK INSTALLATION

ADJUSTING SHOULDER STOCK LENGTH
Turning the Shoulder Stock Screw (#333) counter-clockwise will loosen the Shoulder Stock allowing for three different lengths to be achieved.

Spyder MR3 Manual
Spyder MR3 Paintball Gun and Compressed Air Tank
Spyder MR3 Paintball Gun Electronics and Settings
Spyder MR3 Paintball Guns Battery Charging
Spyder MR3 Disassemble Reassemble and Cleaning Internals
Spyder MR3 T-Cocking Removal
Spyder MR3 Anti Chop Eyes
Spyder MR3 Cup Seal Removal
Spyder MR3 Paintball Gun Schematics

How to get free paintball stuff. You have to know about free Target $500 gift card.

Monday, December 10, 2007

Spyder MR3 Paintball Guns Battery Charging


CHARGING INSTRUCTIONS
To charge a Spyder 9.6 NiMH Battery the circuit board must be in the OFF Position. Spyder Batteries (#JE1015) are not fully charged when purchased. Using the supplied Spyder Charger (#JE1024) place the charger in the charging port which is located at the rear of the trigger frame. Kingman recommends a charging time of 6-8 hours for a complete charge.

IMPORTANT: You should never charge the battery over 24 hours or you can run the risk of damaging the battery or electronics. The battery charger will continue to power until removed from charging port.

NOTE: It is recommended that the battery be chagred prior to use in order to ensure maximum performance, especially if the battery has not been used in over a week.

Spyder MR3 Paintball Guns Battery Charging

SPYDER 9.6 NiMH BATTERY LIFE
Always use the supplied Spyder 9.6volt NiMH Battery and Spyder Charger to operate this marker. A fully charged Spyder Battery will last about 3000 to 5000 shots. Number of shots depends on the settings of your firing methods. Under normal use and charging conditions the expected life of the Spyder 9.6 NiMH Battery to last approximately 700-1000 charging cycles.

WARNING: This marker is not attended to use any normal 9 volt battery or chargers that are NON Spyder Products. Doing so will VOID all electronic warranties.

LOW BATTERY INDICATOR
The LED light located beneath the mode switch on the back of the grip will blink rapidly when the battery power is low and will require charging.

Spyder MR3 Manual
Spyder MR3 Paintball Gun and Compressed Air Tank
Spyder MR3 Paintball Gun Electronics and Settings
Spyder MR3 Paintball Marker Velocity Adjustment
Spyder MR3 Disassemble Reassemble and Cleaning Internals
Spyder MR3 T-Cocking Removal
Spyder MR3 Anti Chop Eyes
Spyder MR3 Cup Seal Removal
Spyder MR3 Paintball Gun Schematics

How to get free paintball stuff. You have to know about free Target $500 gift card.

Spyder MR3 Paintball Gun Electronics and Settings


ELECTRONIC GRIP TROUBLESHOOTING
Check to make sure there is enough air pressure to fire the Spyder MR3 paintball marker.
Battery may need to be recharged.
If the Trigger is not functioning, turn the Trigger Screw (#298) clockwise to shorten the gap between the Touch Switch (#272) using an allen wrench. NOTE: Do not over extend the Trigger Screw (#298) for this can cause the Touch Switch (#272) to stick.
Everytime the trigger set screws are repositioned use thread locker "Loc-Tite" 242 (Blue color) to prevent from loosening.

INSTALLING A BATTERY
STEP 1
Remove the 3 M4x8 screws (#294) and left side grip panel (#270).
STEP 2 Attach the Spyder battery (#JE1015) to the Battery Harness (#E24A).
STEP 3 Retighten the 3 M4x8 screws (#294).

HELPFUL TIP: Please note how the parts are removed for easy reassembly.

REMOVING THE TOURNAMENT LOCK SWITCH
STEP 1
Remove the 3 M4x8 screws (#294) and left side grip panel (#270).
STEP 2 Remove the Tournament Lock Switch (#JE30B) located to the right of the Spyder Battery.

HELPFUL TIP: Having the Tournament Lock Switch removed from the circuit board will deactivate auto.

MODE SETTINGS
Mode Switch Down is in the OFF Position.
MODE 1 Click Up is in Semi-Auto with Eyes ON.
MODE 2 Click Up is in Semi-Auto with Eyes OFF.
MODE 3 Click Up is in Auto with Eyes OFF.

TOURNAMENT MODE SETTING
The MR3 Circuit Board (#331) is equipped with a Tournament Lock Out Switch (#JE30B). When the Tournament Lock Switch is removed from the Circuit Board the marker can only fire in SEMI-AUTO. The Tournament Lock Switch is located on the internal Circuit Board to the right of the Battery. Reattaching the Tournament Lock Switch (#JE30B) back into the Circuit Board will re-enable the multi-mode functions.
IMPORTANT! Kingman recommends that you use a force feed / high speed electronic loader to reach optimum performance. Kingman also recommends the use of a Spyder CO2 / Compressed Air Tank to operate this Spyder MR3 paintball marker. Lastly, the use of tournament grade paint will help reduce the likelihood of paintball breaks when firing the marker.

WARNING

  • The Spyder MR3 Electronic Markers are not water resistant.
  • Extreme moisture can cause serious damage to any Spyder MR3 Electronic Markers.
  • Always clean any dirt or paint inside the Spyder MR3 Markers Electronics.
  • Never attempt to modify the Electronics circuitry. Doing so, it will VOID all electronic warranties.

NOTE: If the Markers Electronics have any dirt or paint, Kingman recommends using an aerosol can of air. Apply the can of air directly at the components that need cleaning.

Spyder MR3 Manual
Spyder MR3 Paintball Gun and Compressed Air Tank
Spyder MR3 Paintball Guns Battery Charging
Spyder MR3 Paintball Marker Velocity Adjustment
Spyder MR3 Disassemble Reassemble and Cleaning Internals
Spyder MR3 T-Cocking Removal
Spyder MR3 Anti Chop Eyes
Spyder MR3 Cup Seal Removal
Spyder MR3 Paintball Gun Schematics

How to get free paintball stuff. You have to know about free Target $500 gift card.

Sunday, December 9, 2007

Spyder MR3 Paintball Gun and Compressed Air Tank


INSTALLING A CO2 / COMPRESSED AIR TANK

Firmly, attach the CO2 / Compressed Air Tank clockwise to the markers Dovetail Bottom Line ASA (#261).

HELPFUL TIP: Make sure when installing a tank, to have the CO2 / Commpressed Air Tank filled. Make sure the CO2 / Compressed Air Tank has a bottle o-ring on the top of the valve to prevent air leaks.

REMOVING A CO2 / COMPRESSED AIR TANK

Firmly, unscrew the CO2 / Compressed Air Tank by turning counter-clockwise.

HELPFUL TIP: After playing with the marker, you should ALWAYS remove the CO2 / Commpressed Air Tank. When the Tank is being removed, excess air will release from the bottom of the Dovetail Line ASA (#261).

IMPORTANT: Never expose any skin underneath the Dovetail Bottom Line ASA (#261) when removing the Tank. This can run the risk getting skin burn from releasing the GAS. Never store any CO2 / Comppressed Air Tank attached to the Spyder MR3 paintball gun.

CO2 / COMPRESSED AIR TANK WARNINGS


  • All valves must only be installed or removed by a qualified airsmith.
  • See CO2 / Compressed Air tank labels for retest dates. Cylinder tanks must be retested periodically.
  • Improper use, filling, storage or disposal of all air cylinders may result in death, personal injury and/or property damage.
  • Always keep cylinders out of reach from children or any inexperienced person(s).
  • Only properly trained personnel in accordance with CGA Pamphlets P.1 and G-6.3 must fill all air cylinders. Pamphlets are available from the Compressed Gas Association or http://www.cganet.com/ .
  • Never alter the cylinder in any way.
  • DO NOT expose pressurized cylinders to temperatures in excess of 130˚F (54˚C).
  • Cylinders heated to an excess of 250˚F (121˚C) must be condemned or requalified in accordance with test defined in CFR-49.
  • The valve should NEVER be detached from the canister. Please seek immediate assistance from a trained airsmith should this occur.
  • Any tank packed with the product is intended for paintball use only.
  • Confirm that there is an attached urethane O-ring on the CO2 / Compressed Air tank valve before attaching the tank to the Spyder MR3 paintball gun. The tank will leak air as soon as it is secured to the marker, if the O-ring is missing from the valve.
  • A urethane O-ring is highly recommended before attaching any air supply to the Spyder MR3 paintball gun.
  • NEVER over pressurize a CO2 / Compressed Air cylinder.
  • Avoid any direct skin exposure to the escaping gas, when installing or removing any air supply.
  • Never expose cylinders to corrosive materials or clean with any caustic cleaners.

DANGER

The CO2 or Compressed Air Tank can fly off with enough force to cause serious injury or death if the Valve unscrews from the cylinder head. LOOK at the Valve when removing the cylinder from the Spyder MR3 paintball gun. Be sure that the valve is turning with the cylinder rather than remaining stationary with the Spyder MR3 paintball gun. STOP if the Valve starts to unscrew from the cylinder. If in doubt, screw the cylinder back onto the marker and contact a trained person for repair.

Spyder MR3 Manual
Spyder MR3 Paintball Gun Electronics and Settings
Spyder MR3 Paintball Guns Battery Charging
Spyder MR3 Paintball Marker Velocity Adjustment
Spyder MR3 Disassemble Reassemble and Cleaning Internals
Spyder MR3 T-Cocking Removal
Spyder MR3 Anti Chop Eyes
Spyder MR3 Cup Seal Removal
Spyder MR3 Paintball Gun Schematics

How to get free paintball stuff. You have to know about free Target $500 gift card.

Wednesday, December 5, 2007

Spyder MR3 Manual


IMPORTANT SAFETY GUIDELINES

This Spyder MR3 paintball marker is NOT a toy; It can cause serious injury or death.
Kingman recommends that customers be at least 18 years of age to purchase this product.
Any modifications or tampering of original factory parts will void all warranties and liabilities from Kingman.
Kingman recommends using a barrel plug or barrel sock when marker is not in operation.
All persons using this product, or within range while this product is in use, must wear eye and face protection specifically designed for paintball.
Never shoot at a person or an animal that is not in a designated paintball facility.
Treat every Spyder MR3 paintball marker as if it were loaded.
Never look down the barrel of a loaded or unloaded marker.
Always keep the Spyder MR3 paintball marker on SAFE until ready to operate.
Always remove CO2/Compressed Air source before disassembly.
Fire only 0.68 caliber paintballs.


Spyder MR3 paintball marker


Spyder MR3 Operation Guide / START UP

WARNING: Always keep the marker powered off or on SAFE until you are ready to shoot.

  1. To install and charge the battery.

  2. To turn the power ON, slide the Selector Switch located on the rear of the trigger frame UP to SEMI w/ EYES, SEMI, or AUTO mode. CAUTION: With the power ON, the Spyder MR3 paintball marker is now ready to shoot.

  3. Cock the Spyder MR3 paintball marker by pulling the Snap T-Cocking Handle (#266) rearward until it latches. CAUTION: If you let go before the handle latches, your marker may fire. NOTE: The Snap T-Cocking Handle will latch the bolt internally, the Handle will not remain in a cocked position after latching the bolt, nor will it move while the marker is being fired. You should hear an audible click and feel a tension release in the Handle when cocking the marker.

  4. Firmly, attach the CO2/Compressed Air Tank clockwise to the markers Dovetail Bottom Line ASA (#261).

  5. It is recommended to use a Force Fed/High Speed Electronic Loader that is capable of feeding paintballs into the Spyder MR3 paintball marker at 17 balls per second or faster to avoid chopping paintballs in the markers breach when shooting at high rates of fire.

  6. Routine lubrication of the marker does not require disassembly of the marker. Put 3-4 drops of Paintball Marker Oil into the Bottom Line ASA (#261), screw in your air tank, point the marker in a safe direction and dry fire (no paintballs in the chamber) 5-10 shots. This procedure will circulate oil through the markers internal parts, thus extending the life of the marker. NOTE: Only use oil that is specifically designed for paintball markers.

  7. It is a good practice to lubricate your Spyder MR3 paintball marker before and after each use, especially when storing the marker for an extended period of time.

  8. When you are finished shooting the marker, be sure to remove the Loader and all paintballs before storing. NOTE: There may be a paintball in the breach of the marker, take a couple of shots in a safe direction to make sure that the Barrel and breach are empty.

  9. Place the Barrel Plug into the Barrel to avoid accidental discharge of the Spyder MR3 paintball marker. Turn the marker OFF and slowly unscrew the air source tank. CAUTION: Do not remove the Tank Valve from the Tank, doing so may cause serious injury or death.

Spyder MR3 Paintball Gun and Compressed Air Tank
Spyder MR3 Paintball Gun Electronics and Settings
Spyder MR3 Paintball Guns Battery Charging
Spyder MR3 Paintball Marker Velocity Adjustment
Spyder MR3 Disassemble Reassemble and Cleaning Internals
Spyder MR3 T-Cocking Removal
Spyder MR3 Anti Chop Eyes
Spyder MR3 Cup Seal Removal
Spyder MR3 Paintball Gun Schematics

How to get free paintball stuff. You have to know about free Target $500 gift card.

Tuesday, November 20, 2007

Spyder MR3 Paintball Gun


Spyder MR3 Paintball Gun


Electronic firing modes: Semi (Eye On/Off, Auto)
Shoots up to 25 balls per second
Seamless Eye device breaks less paint
True military style adjustable shoulder stock
Removable rised sight rail/handle
Full size strength and agility

MSRP: $329,95

Spyder MR3 manual 625KB (PDF)

Spyder MR Series Guns

How to get free paintball stuff. You have to know about free Target $500 gift card.

Wednesday, November 14, 2007

Spyder MR Series Guns


The Spyder MR Series guns is Spyder’s answer to what a scenario player needs; rugged aluminum construction combined with the speed and performance of a tournament level marker.

Raised site-rails and mounting platforms encourage the use of add-on devices while removable stocks allow for easy customization to each player’s individual needs. Sturdy marker body construction serves to protect the internals of each Spyder MR marker without adding signifcant weight, thus keeping the system light while helping it withstand even the most aggressive styles of play.

The Spyder MR Series guns now provides four options for paintball markers, the Spyder MR1, Spyder MR2, Spyder MR3 and the new Spyder E-MR1. Each marker provides unique features that will help make the MR name synonymous with victory in the realm of scenario paintball.

Spyder MR Series Markers


Spyder MR1 Semi-Auto

Spyder MR1 Semi-Auto

Style: Military Style Semi-Auto Paintball Marker
Bolt: Quick Strip Delrin Bolt

MSRP: $139,95


Spyder E-MR-1 Electronic

Spyder E-MR-1 Electronic

Style: Military Style Electronic Paintball Marker
Firing modes: 3 Modes of Operation (Semi-Auto, Full Auto and Burst),15 BPS
Bolt: Top Cocking Delrin Bolt

MSRP: $199,95


Spyder MR2 Electronic

Spyder MR2 Electronic

Style: Military Style Electronic Paintball Marker
Firing modes: 3 Modes of Operation (Semi-Auto, Full Auto and Burst),25 BPS
Bolt: Anti Chop System (ACS) Delrin Bolt

MSRP: $249,95


Spyder MR3 Electronic w/eyes

Spyder MR3 Electronic w/eyes

Style: Military Assault Style Electronic Paintball Marker
Firing modes: 3 Modes of Operation (Semi EYES On, Semi EYES Off and Full Auto),25 BPS
Bolt: Delrin Bolt Construction with Break Beam Eye Ball Detection System

MSRP: $329,95


How to get free paintball stuff. You have to know about free Target $500 gift card.

Wednesday, October 31, 2007

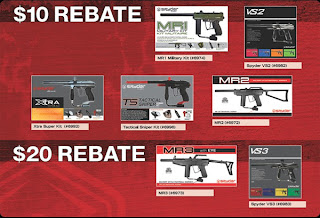
2007 Spyder Rebate Program


Save on select Spyder products!
Spyder is pleased to offer further savings to our customers through our new 2007 Spyder Rebate Program. The savings program is effective from October 1st, 2007 through January 15th, 2008. You are entitled up to $20 cash back on the purchase of select Spyder products. In order to qualify for a $10 cash back rebate, the purchase of any Spyder VS2 (#6982), MR2 (#6972), Xtra Super Kit (#6992), Tactical Sniper Kit (#6996), or MR1 Kit (#6974) must be made between 10/01/07 and 1/15/08. In order to qualify for a $20 cash back rebate, the purchase of any Spyder VS3 (#6983), or MR3 (#6973) must be made between 10/01/07 and 1/15/08. See your local paintball store, or chain store for rebate coupon at time of purchase. A downloadable coupon is available below if necessary to complete your savings. Complete rebate details are available on the mail-in coupon.


$10 Rebate Products
Spyder VS2 (#6982)
Spyder MR2 (#6972)
Spyder Xtra Super Kit (#6992)
Spyder Tactical Sniper Kit (#6996)
Spyder MR1 Kit (#6974)


$20 Rebate Products
Spyder VS3 (#6983)
Spyder MR3 (#6973)


2007 Spyder Mail-In Rebate Coupon
196 KB PDF File

Kingman GroupDate:
October 2nd, 2007
Contact: 626-430-2300
Los Angeles, CA, USA

Wednesday, October 24, 2007

Spyder Paintball Guns


The Spyder paintball guns are the one of the best, most reliable and popular paintball markers or guns now available on the market. Spyder paintball guns are reasonably priced and are jam-packed with the latest sophistication in the paintball marker technology. Spyder paintball guns are guaranteed to give the player a solid performance at an affordable price. Spyder paintball guns are present in almost, if not all, paintball field. Spyder paintball guns are highly versatile; upgrading them won't be a problem.

Spyder paintball guns were first introduced in 1994. The Spyder paintball markers revolutionalized the paintball industry by featuring top performance level and affordable price. The first Spyder paintball markers have a powerful, sleek and at the same time lightweight design.

Today's Spyder paintball guns introduced the world's first anti-chop bolt called the "anti-chop system". The ACS precision spring tension recognizes any obstruction or jamming of the paintball pellets before crushing it. Thus, reduces paintball marker malfunctions. Lets you have more time to enjoy shooting the opponents. The Spyder paintball guns also have a trigger frame system known as "the Spyder rocking trigger frame". This system is a two-in-one trigger that rocks between two contact points. Thus, increasing your speed and allows you to deliver more paintball pellets per second. This system is compatible to all types of Spyder paintball guns and very much easy to set up.

Some paintball players say that Spyder paintball markers are great buys for its price, although Spyder paintball markers may lack some features of other high end blowback paintball markers, it still operates very well for a paintball marker of its price. Some Spyder paintball markers do not have lots of features but the good thing with it is that it does not break down as often as most paintball markers that has the same price.

Here are some of the latest and most widely used Spyder paintball markers available on the market:

Spyder Electra:
The Spyder Electra is the most expensive marker of the Spyder paintball marker series. It has an electronic board with a colored access mode display. The Spyder Electra has a three round burst, six round burst, Full Auto, and safety modes. It can shoot up to twenty balls per second on its aero twist accuracy barrel. The Spyder Electra operates on both compressed air and carbon dioxide.

Spyder MR Series:
The Spyder MR series is engineered to withstand the toughest play scenario. The Spyder MR series are perfectly balanced for a more comfortable grip and has the innovative "ACS" or "Anti-Chop System". The marker features a full range of firing modes and comes with a rechargeable battery. The Spyder MR series is one of the toughest Spyder paintball guns ever produced.

How to get free paintball stuff. You have to know about free Target $500 gift card.