Friday, December 21, 2007

“One With The Gun” Starring Maximus Lundqvist now available!!


For the first time ever, world-class paintballer Maximus Lundqvist, star player from the legendary team Joy Division, shares with viewers the tactics and techniques that make him one of the most feared players on the field today in his first Paintball instructional DVD, titled “One with the Gun”, produced and shot by the award winning team over at SPLAT Magazine. Geared towards the experienced tournament paintballer, "One with the Gun" provides viewers with over one and a half hours of the skill and training secrets needed to be a world champion. Just some of the techniques featured include:


  • Snap-shooting
  • Running and Gunning
  • The Magic Line
  • Break-out Shooting
  • Physical Training
  • Basic Stance and much more.

Co-hosted by legendary SPLAT Girl and “Deal or No Deal” star Lisa Gleave, as well as co-starring the NPPL Championship winning SPLAT Kids tournament team, “One with the Gun” is a must own for anyone serious about improving their paintball ability.

Available now at http://www.onewiththegundvd.com/

How to get free paintball stuff. You have to know about free Target $500 gift card.

Xtreme Paintball Seasons 1 and 2 Hit FSN this Summer
NPPL to Host 1st Annual All-Star Game — Xtreme Paintball
One With the Gun Now Available as a Digital Download!
Xtreme Paintball: Beyond the Paint DVD Set Today!

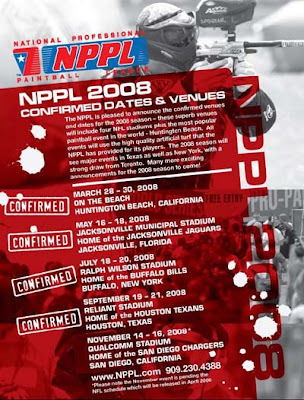
NPPL 2008 Dates and Venues


The NPPL is pleased to announce the confirmed venues and dates for the 2008 season - these superb venues will include four NFL stadiums plus the most popular paintball event in the world - Huntington Beach. All events will use the high quality artificial turf that the NPPL has provided for its players. The 2008 season will see major events in Texas as well as New York, with a strong draw from Toronto. Many more exciting announcements for the 2008 season to come!

March 28 - 30, 2008 (Confirmed)
On the Beach
Huntington Beach, California


May 16 - 18, 2008 (Confirmed)
Jacksonville Municipal Stadium
Home of the Jacksonville Jaguars
Jacksonville, Florida

July 18 - 20, 2008 (Confirmed)
Ralph Wilson Stadium
Home of the Buffalo Bills
Buffalo, New York


September 19 - 21, 2008 (Confirmed)
Reliant Stadium
Home of the Houston Texans
Houston, Texas

November 14 - 16, 2008*
Qualcomm Stadium
Home of the San Diego Chargers
San Diego, California

*Please note the November event is pending the NFL schedule which will be released in April 2008


NPPL 2008 Dates and Venues

Sunday, December 16, 2007

Spyder MR3 Anti Chop Eyes


The Anti Chop Eyes help prevent chopping paint by not allowing the marker to fire until a paintball is in front of the Venturi Bolt. The Eyes transmit a beam across the inside of the breech. The Circuit Board is preset from the factory and does not need to be adjusted or altered. If the Eyes are ON and do not see each other when firing your marker, you will have to clean the Eyes.

Spyder MR3 Cleaning The Anti Chop Eyes
Using a squeegee or swab thru the breech should clean the Eyes enough for the beams to detect each other. Another way is to use an aerosol can of air thru the breech to remove paint or dirt from the Eyes. To thoroughly clean the Eyes remove all M4 x 8 Screws (#294) (including the lower screw not pictured which holds the Feed Neck), the Eye / Detent Cover (#329) and the Feed Neck (#321) using an allen wrench. Once the M4 x 8 Screws (#294), Eye / Detent Cover (#329), and Feed Neck (#321) are removed, precede with a soft pinch to remove the Eye Wire Harness (#243) from the receiver. Remove all dirt or paint that is blocking the Eyes and causing it to malfunction.

Spyder MR3 Anti Chop Eyes

HELPFUL TIP: Please note how the parts are removed for easy reassembly.

IMPORTANT: Cleaning the Eyes often will help reduce dirt, paint or oil residue that blocks the Eyes from seeing each other.

NOTE: Never attempt to rush the cleaning process or you can pinch the wires and cause the marker to malfunction with the Eye Mode ON. Take precaution not to over tighten the M4 x 8 Screw (#294) or this can lead stripping the head.

CHANGING THE BALL DETENTS
Experiencing paint rolling through the barrel, can be related to small diameter of paintballs or the lost of a ball detent(s). When removing the Eye / Detent Cover (#329) and Feed Neck (#321) the Ball Detents (#03) will become accessable to be cleaned or replaced.

HELPFUL TIP: Please note how the parts are removed for easy reassembly.

NOTE: Take precaution not to over tighten the M4 x 8 (#294) or this can lead to stripping the head.

Spyder MR3 Manual
Spyder MR3 Paintball Gun and Compressed Air Tank
Spyder MR3 Paintball Gun Electronics and Settings
Spyder MR3 Paintball Guns Battery Charging
Spyder MR3 Paintball Marker Velocity Adjustment
Spyder MR3 Disassemble Reassemble and Cleaning Internals
Spyder MR3 T-Cocking Removal
Spyder MR3 Cup Seal Removal
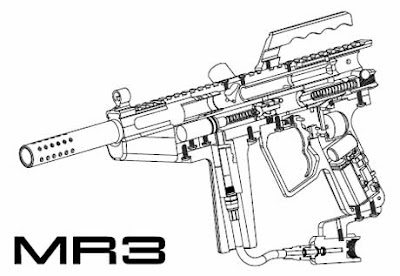
Spyder MR3 Paintball Gun Schematics

How to get free paintball stuff. You have to know about free Target $500 gift card.

Spyder MR3 T-Cocking Removal


Spyder MR3 Paintball Marker T-Cocking Removal

STEP 1 Remove Flat M4 x 8 Screw (#334).
STEP 2 Slide the Snap Rail Cover (#269) toward the rear of the marker.
STEP 3 Remove Snap T-Knob (#266).
STEP 4 Remove the Snap T-Clip (#267). NOTE: Be careful while removing the Snap T-Springs (#268) as the tension may cause them to fly off.
HELPFUL TIP: Please note how the parts are removed for easy reassembly.


Spyder MR3 Paintball Marker T-Cocking Removal

Spyder MR3 Paintball Marker Trigger Adjustment

Adjusting the Top Trigger Set Screw (#298) clockwise will swing the Trigger (#273) closer the Touch Switch (#272) which will lessen the trigger gap. NOTE: Adjusting the Trigger Set Screw (#298) counter-clockwise will increase the trigger gap.

Adjusting the lower Trigger Set Screw (#298) clockwise will shorten the Trigger (#273) stroke to the Touch Switch (#272) this will increase Trigger (#273) sensitivity. NOTE: Adjusting the Trigger Set Screw (#298) counter-clockwise will decrease the Trigger (#273) sensitivity.


Spyder MR3 Paintball Marker T-Cocking Removal

Spyder MR3 Manual
Spyder MR3 Paintball Gun and Compressed Air Tank
Spyder MR3 Paintball Gun Electronics and Settings
Spyder MR3 Paintball Guns Battery Charging
Spyder MR3 Paintball Marker Velocity Adjustment
Spyder MR3 Disassemble Reassemble and Cleaning Internals
Spyder MR3 Anti Chop Eyes
Spyder MR3 Cup Seal Removal
Spyder MR3 Paintball Gun Schematics

How to get free paintball stuff. You have to know about free Target $500 gift card.

Spyder MR3 Disassemble Reassemble and Cleaning Internals


TROUBLESHOOTING
ONE OR MORE OF THE FOLLOWING MAY CAUSE RECOCKING RELATED PROBLEMS:
The pressure in the tank is too low. In some cases, the weather can affect the liquid in the tank
and not cause it not to expand into carbon dioxide gas.
Spyder MR3 paintball marker needs lubrication.
Venturi Bolt (#326) needs to be cleaned.
The Striker O-ring (#19A) is damaged. Replace with new Kingman or Kingman-approved O-ring. NOTE: The O-ring (#19) cannot be substituted by a tank O-ring or an #09 O-ring.
Need to clean Barrel and upper chamber of the Receiver (#325).
Paintballs may be defective (i.e. expired, odd shape, etc.)
After ball breaks in Barrel or chamber, remove all parts from upper chamber of Receiver, wipe parts clean, and reassemble parts into Receiver. Also make sure to clean the Barrel with a squeegee.

DISASSEMBLE REAR INTERNALS
STEP 1 Remove Quick Disconnect Pin (#262). NOTE: Place a finger over the Striker Plug (#260) before removing the Quick Disconnect Pin (#262)
STEP 2 Remove the Striker Plug (#262) Main Spring (#25) Striker Buffer (#26A).
STEP 3 Remove the following items at the same time. Striker Bolt (#JE18A) and the Delrin Venturi Blot (#326).

HELPFUL TIP: Please note how the parts are removed for easy reassembly.

REASSEMBLE REAR INTERNALS
When reassembling the Delrin Venturi Bolt (#326) and Striker Bolt (#JE18A) the circuit board must be powered ON with the Eyes OFF. Join the Delrin Venturi Bolt (#326) and Striker Bolt (#JE18A) together entering the back end of the Receiver (#325). Simultaneously pull the Blade Trigger (#273) and apply pressure behind the Delrin Venturi Bolt (#326) to allow reentry of both parts. Reinstall the Striker Buffer (#26A), Striker Spring (#25) Striker Plug (#260) and press in the Quick Disconnect Pin (#262) to lock down all back internals.

HELPFUL TIP: When the back internals are removed it would be wise to clean any dirt or paint from inside the Receiver (#325) with a stick swab or cable squeegee. Wipe the Delrin Venturi Bolt (#326) with a rag or paper towel. The Striker O-Ring (#19A) will need to be oiled periodically. Kingman recommends that each time the back internals are removed the Striker O-Ring (#19A) should be oiled.

IMPORTANT: Never oil the Delrin Venturi Bolt (#326). This will swell the bolt and cause cocking problems. Striker Buffer (#26A) should be installed behind the Striker Bolt (#JE18A) to ensure proper functioning.

WARNING: Never attempt to remove the Spyder MR3 paintball markers internals while the CO2 / Compressed Air bottle is attached. Make sure to remove all paintballs and loader before disassembling the marker.

Spyder MR3 Manual
Spyder MR3 Paintball Gun and Compressed Air Tank
Spyder MR3 Paintball Gun Electronics and Settings
Spyder MR3 Paintball Guns Battery Charging
Spyder MR3 Paintball Marker Velocity Adjustment
Spyder MR3 T-Cocking Removal
Spyder MR3 Anti Chop Eyes
Spyder MR3 Cup Seal Removal
Spyder MR3 Paintball Gun Schematics

How to get free paintball stuff. You have to know about free Target $500 gift card.

Spyder MR3 Paintball Marker Velocity Adjustment


VELOCITY ADJUSTMENT INCREASE/DECREASE
To increase your velocity FPS (Feet per second) using the allen wrench turn the Velocity Adjuster (#296) clockwise.
To decrease your velocity FPS (Feet per second) using the allen wrench turn the Velocity Adjuster (#296) counterclockwise.
NOTE: Velocity Adjuster w/Spring Guide (#296) doesn’t remove from the rear of the Striker Plug (#260).

Spyder MR3 Paintball Marker Velocity Adjustment

WARNING

  • The recommended Velocity speed should be no greater then 300fps. Not doing so can cause serious injury if the velocity is dangerously high.
  • Spyder MR3 paintball markers are not intended to shoot any person less then 25 feet.
  • Never point a loaded Spyder MR3 paintball marker at any person who is not wearing the proper face protection.
  • Never at any time should you look down the barrel when the marker is loaded or not.
  • Using a paintball marker outside a non designated paintball field can be illegal, and is subject to law enforcement penalties if property damage is caused by the user.

SPYDER MR3 PAINTBALL MARKER SHOULDER STOCK INSTALLATION

Place the Shoulder Stock (#332) on the back end upper section of the Receiver (#325). Once the Shoulder Stock is in place tighten the Set Screw (#16) to secure the stock to the body of the marker.
The Set Screw (#16) is located on the right side of the receiver.

SPYDER MR3 PAINTBALL MARKER SHOULDER STOCK INSTALLATION

ADJUSTING SHOULDER STOCK LENGTH
Turning the Shoulder Stock Screw (#333) counter-clockwise will loosen the Shoulder Stock allowing for three different lengths to be achieved.

Spyder MR3 Manual
Spyder MR3 Paintball Gun and Compressed Air Tank
Spyder MR3 Paintball Gun Electronics and Settings
Spyder MR3 Paintball Guns Battery Charging
Spyder MR3 Disassemble Reassemble and Cleaning Internals
Spyder MR3 T-Cocking Removal
Spyder MR3 Anti Chop Eyes
Spyder MR3 Cup Seal Removal
Spyder MR3 Paintball Gun Schematics

How to get free paintball stuff. You have to know about free Target $500 gift card.

Monday, December 10, 2007

Spyder MR3 Paintball Guns Battery Charging


CHARGING INSTRUCTIONS
To charge a Spyder 9.6 NiMH Battery the circuit board must be in the OFF Position. Spyder Batteries (#JE1015) are not fully charged when purchased. Using the supplied Spyder Charger (#JE1024) place the charger in the charging port which is located at the rear of the trigger frame. Kingman recommends a charging time of 6-8 hours for a complete charge.

IMPORTANT: You should never charge the battery over 24 hours or you can run the risk of damaging the battery or electronics. The battery charger will continue to power until removed from charging port.

NOTE: It is recommended that the battery be chagred prior to use in order to ensure maximum performance, especially if the battery has not been used in over a week.

Spyder MR3 Paintball Guns Battery Charging

SPYDER 9.6 NiMH BATTERY LIFE
Always use the supplied Spyder 9.6volt NiMH Battery and Spyder Charger to operate this marker. A fully charged Spyder Battery will last about 3000 to 5000 shots. Number of shots depends on the settings of your firing methods. Under normal use and charging conditions the expected life of the Spyder 9.6 NiMH Battery to last approximately 700-1000 charging cycles.

WARNING: This marker is not attended to use any normal 9 volt battery or chargers that are NON Spyder Products. Doing so will VOID all electronic warranties.

LOW BATTERY INDICATOR
The LED light located beneath the mode switch on the back of the grip will blink rapidly when the battery power is low and will require charging.

Spyder MR3 Manual
Spyder MR3 Paintball Gun and Compressed Air Tank
Spyder MR3 Paintball Gun Electronics and Settings
Spyder MR3 Paintball Marker Velocity Adjustment
Spyder MR3 Disassemble Reassemble and Cleaning Internals
Spyder MR3 T-Cocking Removal
Spyder MR3 Anti Chop Eyes
Spyder MR3 Cup Seal Removal
Spyder MR3 Paintball Gun Schematics

How to get free paintball stuff. You have to know about free Target $500 gift card.

Spyder MR3 Paintball Gun Electronics and Settings


ELECTRONIC GRIP TROUBLESHOOTING
Check to make sure there is enough air pressure to fire the Spyder MR3 paintball marker.
Battery may need to be recharged.
If the Trigger is not functioning, turn the Trigger Screw (#298) clockwise to shorten the gap between the Touch Switch (#272) using an allen wrench. NOTE: Do not over extend the Trigger Screw (#298) for this can cause the Touch Switch (#272) to stick.
Everytime the trigger set screws are repositioned use thread locker "Loc-Tite" 242 (Blue color) to prevent from loosening.

INSTALLING A BATTERY
STEP 1
Remove the 3 M4x8 screws (#294) and left side grip panel (#270).
STEP 2 Attach the Spyder battery (#JE1015) to the Battery Harness (#E24A).
STEP 3 Retighten the 3 M4x8 screws (#294).

HELPFUL TIP: Please note how the parts are removed for easy reassembly.

REMOVING THE TOURNAMENT LOCK SWITCH
STEP 1
Remove the 3 M4x8 screws (#294) and left side grip panel (#270).
STEP 2 Remove the Tournament Lock Switch (#JE30B) located to the right of the Spyder Battery.

HELPFUL TIP: Having the Tournament Lock Switch removed from the circuit board will deactivate auto.

MODE SETTINGS
Mode Switch Down is in the OFF Position.
MODE 1 Click Up is in Semi-Auto with Eyes ON.
MODE 2 Click Up is in Semi-Auto with Eyes OFF.
MODE 3 Click Up is in Auto with Eyes OFF.

TOURNAMENT MODE SETTING
The MR3 Circuit Board (#331) is equipped with a Tournament Lock Out Switch (#JE30B). When the Tournament Lock Switch is removed from the Circuit Board the marker can only fire in SEMI-AUTO. The Tournament Lock Switch is located on the internal Circuit Board to the right of the Battery. Reattaching the Tournament Lock Switch (#JE30B) back into the Circuit Board will re-enable the multi-mode functions.
IMPORTANT! Kingman recommends that you use a force feed / high speed electronic loader to reach optimum performance. Kingman also recommends the use of a Spyder CO2 / Compressed Air Tank to operate this Spyder MR3 paintball marker. Lastly, the use of tournament grade paint will help reduce the likelihood of paintball breaks when firing the marker.

WARNING

  • The Spyder MR3 Electronic Markers are not water resistant.
  • Extreme moisture can cause serious damage to any Spyder MR3 Electronic Markers.
  • Always clean any dirt or paint inside the Spyder MR3 Markers Electronics.
  • Never attempt to modify the Electronics circuitry. Doing so, it will VOID all electronic warranties.

NOTE: If the Markers Electronics have any dirt or paint, Kingman recommends using an aerosol can of air. Apply the can of air directly at the components that need cleaning.

Spyder MR3 Manual
Spyder MR3 Paintball Gun and Compressed Air Tank
Spyder MR3 Paintball Guns Battery Charging
Spyder MR3 Paintball Marker Velocity Adjustment
Spyder MR3 Disassemble Reassemble and Cleaning Internals
Spyder MR3 T-Cocking Removal
Spyder MR3 Anti Chop Eyes
Spyder MR3 Cup Seal Removal
Spyder MR3 Paintball Gun Schematics

How to get free paintball stuff. You have to know about free Target $500 gift card.

Sunday, December 9, 2007

Spyder MR3 Paintball Gun and Compressed Air Tank


INSTALLING A CO2 / COMPRESSED AIR TANK

Firmly, attach the CO2 / Compressed Air Tank clockwise to the markers Dovetail Bottom Line ASA (#261).

HELPFUL TIP: Make sure when installing a tank, to have the CO2 / Commpressed Air Tank filled. Make sure the CO2 / Compressed Air Tank has a bottle o-ring on the top of the valve to prevent air leaks.

REMOVING A CO2 / COMPRESSED AIR TANK

Firmly, unscrew the CO2 / Compressed Air Tank by turning counter-clockwise.

HELPFUL TIP: After playing with the marker, you should ALWAYS remove the CO2 / Commpressed Air Tank. When the Tank is being removed, excess air will release from the bottom of the Dovetail Line ASA (#261).

IMPORTANT: Never expose any skin underneath the Dovetail Bottom Line ASA (#261) when removing the Tank. This can run the risk getting skin burn from releasing the GAS. Never store any CO2 / Comppressed Air Tank attached to the Spyder MR3 paintball gun.

CO2 / COMPRESSED AIR TANK WARNINGS


  • All valves must only be installed or removed by a qualified airsmith.
  • See CO2 / Compressed Air tank labels for retest dates. Cylinder tanks must be retested periodically.
  • Improper use, filling, storage or disposal of all air cylinders may result in death, personal injury and/or property damage.
  • Always keep cylinders out of reach from children or any inexperienced person(s).
  • Only properly trained personnel in accordance with CGA Pamphlets P.1 and G-6.3 must fill all air cylinders. Pamphlets are available from the Compressed Gas Association or http://www.cganet.com/ .
  • Never alter the cylinder in any way.
  • DO NOT expose pressurized cylinders to temperatures in excess of 130˚F (54˚C).
  • Cylinders heated to an excess of 250˚F (121˚C) must be condemned or requalified in accordance with test defined in CFR-49.
  • The valve should NEVER be detached from the canister. Please seek immediate assistance from a trained airsmith should this occur.
  • Any tank packed with the product is intended for paintball use only.
  • Confirm that there is an attached urethane O-ring on the CO2 / Compressed Air tank valve before attaching the tank to the Spyder MR3 paintball gun. The tank will leak air as soon as it is secured to the marker, if the O-ring is missing from the valve.
  • A urethane O-ring is highly recommended before attaching any air supply to the Spyder MR3 paintball gun.
  • NEVER over pressurize a CO2 / Compressed Air cylinder.
  • Avoid any direct skin exposure to the escaping gas, when installing or removing any air supply.
  • Never expose cylinders to corrosive materials or clean with any caustic cleaners.

DANGER

The CO2 or Compressed Air Tank can fly off with enough force to cause serious injury or death if the Valve unscrews from the cylinder head. LOOK at the Valve when removing the cylinder from the Spyder MR3 paintball gun. Be sure that the valve is turning with the cylinder rather than remaining stationary with the Spyder MR3 paintball gun. STOP if the Valve starts to unscrew from the cylinder. If in doubt, screw the cylinder back onto the marker and contact a trained person for repair.

Spyder MR3 Manual
Spyder MR3 Paintball Gun Electronics and Settings
Spyder MR3 Paintball Guns Battery Charging
Spyder MR3 Paintball Marker Velocity Adjustment
Spyder MR3 Disassemble Reassemble and Cleaning Internals
Spyder MR3 T-Cocking Removal
Spyder MR3 Anti Chop Eyes
Spyder MR3 Cup Seal Removal
Spyder MR3 Paintball Gun Schematics

How to get free paintball stuff. You have to know about free Target $500 gift card.

Saturday, December 8, 2007

NPPL 2007 Series Concludes at Qualcomm Stadium


SAN DIEGO, Dec. 6 /PRNewswire/ — The year-end event of the National Professional Paintball League's 2007 season, the World Championships, was held outside of San Diego's Qualcomm Stadium November 30th - December 2nd, 2007. The three day event included a massive trade show along 5 playing fields where the top 150 teams from around the world competed for not only $100,000 cash, but more importantly for the most prestigious title in the paintball industry: NPPL Series Champions.

The event had an estimated 20,000 attendees, even with the generally rainy weather on Friday/Saturday. The event was watched on the NPPL's free live web cast, with television quality video and replays, by an estimated 50,000 viewers from around the world who watched on average in excess of approximately one hour each.

Congratulations to San Diego Dynasty as they not only won the final event of the NPPL's 2007 season, they are also the 2007 NPPL Super 7 World Series Champions. San Diego Dynasty battled it out against St. Louis Avalanche for 1st and 2nd place, while New England Hurricanes and Edmonton Impact placed 3rd and 4th respectively. In the Semi-Professional League, A-Team took 1st and earned the Series Championship after defeating Impact in a best of three while Arsenal Evolution placed 3rd and SA X-factor finished 4th.

The NPPL's platinum sponsors include Mad Croc, Rockstar, the US Marines, JT, Spyder and Angel.

The sport of paintball is the No. 1 extreme sport in the United States, according to the National Sporting Goods Association. The only team extreme sport, paintball participation increased by 44% from 2001 to 2006.

Pacific Paintball LLC is the leading owner/operator of Paintball industry businesses which cater to the highly desirable paintball audience and producer of the television show Xtreme Paintball: Beyond the Paint airing on FSN Tuesdays at 4:30 pm and Mondays at 5:30 pm through December.

via http://www.reuters.com/article/pressRelease/idUS209273+06-Dec-2007+PRN20071206

How to get free paintball stuff. You have to know about free Target $500 gift card.

NPPL Kicks off the 2008 Season in Huntington Beach


The National Professional Paintball League (NPPL) is kicking off the first event of the 2008 uper 7 World Series of Paintball in Huntington Beach, California. The 220 top paintball teams from around the world will be competing March 28th - 30th on six fields set up on the beach just south of the famous Pier Plaza and over 80,000 spectators are expected to attend.

Paintball is a game based on the traditional format of Capture the Flag. The exciting Super 7 format matches two seven-man teams against each other on a paintball field about the size of a tennis court with a number of inflated shapes that offer some cover to the players. Each game lasts a maximum of 7 minutes and whichever team eliminates the other and captures the opposing teams flag wins the entire match. The action is fast and furious.


WHEN: March 28, 29 and 30, 2008

WHERE: Huntington Beach, South of Pier Plaza

HOURS: 7:30 am to 8pm Friday Saturday
8:00 am 5:00 pm Sunday

ATTENDANCE:
Admission is free. Over fifty thousand spectators are expected to be watching the exciting finals on Sunday afternoon where the top team will take home at least $25,000. Estimates for the three day event range from 80,000 to 100,000 people.

ACTIVITES/INFO:


  • The Trade Expo Trade Show opens daily 9:00 am to 6:00 pm.
  • More than 60 of the world's biggest and best vendors and sponsors.
  • See all the new top of the line gear
  • Great deals direct to public
  • Talk to the manufactures directly

The Paintball:

  • Divisional Paintball Play Friday and Saturday on Six Fields.
  • Pro players will be signing Autographs on Friday.
  • Saturday afternoon watch the top 18 pro teams compete against each other.
  • Sunday - finals day - 8.00 am to 5.00 pm Center Court
  • Fun for the entire family. Paintball on the Beach. Spectators can walk to HB downtown shops and restaurants.
  • Grandstand seats can be reserved by purchasing tickets onsite.
  • TV Celebrities making appearances on site throughout the weekend

Paintball Field Layouts for Huntington Beach NPPL 2008

How to get free paintball stuff. You have to know about free Target $500 gift card.

Wednesday, December 5, 2007

2007 World Championships and Series Recap


The year-end event of the National Professional Paintball League's 2007 season, the World Championships, was held outside of San Diego's Qualcomm Stadium November 30th — December 2nd, 2007. The three day event included a massive trade show along 5 playing fields where the top 150 teams from around the world competed for not only $100,000 cash, but more importantly for the most prestigious title in the paintball industry: NPPL Series hampions.
Quoted by players, media and sponsors alike as being the greatest NPPL event of the year, if not ever, the San Diego NPPL surpassed many expectations. The event was watched on the NPPL's free live web cast, with television quality video and replays, by an estimated 50,000 viewers from around the world who watched on average in excess of approximately one hour each.

The NPPL has received many compliments on the quality refereeing at this event and we would like to thank all of those officials who did such an amazing job while enduring rain and cold. The refereeing program began undergoing changes only weeks ago, with a two day intensive training retreat, and already the result of the hard work is being realized. These efforts will continue and only intensify throughout the off-season.

NPPL's impressive Center Court had 23 foot high massive pillars boasting the champions of all 24 NPPL events, the largest grandstands to-date which were packed full with fans from around the world, and four VIP decks along Center Court sponsored by Spyder, JT, NXE and the NPPL. The atmosphere around all games and promotions held on Center Court was simply fantastic. Teams enjoyed the high quality artificial turf that the NPPL introduced this season, which worked well even with some rain and has allowed the NPPL to stage top quality tournaments at NFL stadium venues as well as on the beach.

Congratulations to San Diego Dynasty as they not only won the final event of the NPPL's 2007 season, they are also the 2007 NPPL Super 7 World Series Champions. San Diego Dynasty has been the NPPL Super 7 World Series Champions for now five years in a row, although several teams have come close to taking away the crown.

San Diego Dynasty battled it out against St. Louis Avalanche for 1st and 2nd place, while New England Hurricanes and Edmonton Impact placed 3rd and 4th respectively.

In the Semi-Professional League, A-Team took 1st and earned the Series Championship after defeating Impact in a best of three while Arsenal Evolution placed 3rd and SA X-factor finished 4th.

In Division 1, Dynasty Entourage won two in a row against Crims Underground giving Entourage first place for the event as well as the Series Championship. Naughty by Nature placed 3rd and Nurv finished 4th.

In Division 2, after a draw for their first match-up, Arsenal Kidz defeated Tombstone for 1st and 2nd while the Predators placed 3rd and 187 cRew placed 4th. This 4th place was enough to give 187 cRew a much deserved Series Championship title.

In Division 3, Rockstar Factory Red cleaned house by defeating HKN by Pbphoto.com in their first two match ups, giving Rockstar Factory Red the event title. The battle for 3rd and 4th wasn't as easy since Enigma had to win a 1 on 1 tie-breaker against Xclusive to place 3rd. Xclusive had plenty to celebrate though as they accumulated the most points over the season and are now Division 3 Series Champions.

All rankings and final scores can be found at http://www.nppl.com/

How to get free paintball stuff. You have to know about free Target $500 gift card.

NPPL 2007 Grand Finale: Better than Ever
Field Layout for San Diego Commander's Cup 2007

Spyder MR3 Manual


IMPORTANT SAFETY GUIDELINES

This Spyder MR3 paintball marker is NOT a toy; It can cause serious injury or death.
Kingman recommends that customers be at least 18 years of age to purchase this product.
Any modifications or tampering of original factory parts will void all warranties and liabilities from Kingman.
Kingman recommends using a barrel plug or barrel sock when marker is not in operation.
All persons using this product, or within range while this product is in use, must wear eye and face protection specifically designed for paintball.
Never shoot at a person or an animal that is not in a designated paintball facility.
Treat every Spyder MR3 paintball marker as if it were loaded.
Never look down the barrel of a loaded or unloaded marker.
Always keep the Spyder MR3 paintball marker on SAFE until ready to operate.
Always remove CO2/Compressed Air source before disassembly.
Fire only 0.68 caliber paintballs.


Spyder MR3 paintball marker


Spyder MR3 Operation Guide / START UP

WARNING: Always keep the marker powered off or on SAFE until you are ready to shoot.

  1. To install and charge the battery.

  2. To turn the power ON, slide the Selector Switch located on the rear of the trigger frame UP to SEMI w/ EYES, SEMI, or AUTO mode. CAUTION: With the power ON, the Spyder MR3 paintball marker is now ready to shoot.

  3. Cock the Spyder MR3 paintball marker by pulling the Snap T-Cocking Handle (#266) rearward until it latches. CAUTION: If you let go before the handle latches, your marker may fire. NOTE: The Snap T-Cocking Handle will latch the bolt internally, the Handle will not remain in a cocked position after latching the bolt, nor will it move while the marker is being fired. You should hear an audible click and feel a tension release in the Handle when cocking the marker.

  4. Firmly, attach the CO2/Compressed Air Tank clockwise to the markers Dovetail Bottom Line ASA (#261).

  5. It is recommended to use a Force Fed/High Speed Electronic Loader that is capable of feeding paintballs into the Spyder MR3 paintball marker at 17 balls per second or faster to avoid chopping paintballs in the markers breach when shooting at high rates of fire.

  6. Routine lubrication of the marker does not require disassembly of the marker. Put 3-4 drops of Paintball Marker Oil into the Bottom Line ASA (#261), screw in your air tank, point the marker in a safe direction and dry fire (no paintballs in the chamber) 5-10 shots. This procedure will circulate oil through the markers internal parts, thus extending the life of the marker. NOTE: Only use oil that is specifically designed for paintball markers.

  7. It is a good practice to lubricate your Spyder MR3 paintball marker before and after each use, especially when storing the marker for an extended period of time.

  8. When you are finished shooting the marker, be sure to remove the Loader and all paintballs before storing. NOTE: There may be a paintball in the breach of the marker, take a couple of shots in a safe direction to make sure that the Barrel and breach are empty.

  9. Place the Barrel Plug into the Barrel to avoid accidental discharge of the Spyder MR3 paintball marker. Turn the marker OFF and slowly unscrew the air source tank. CAUTION: Do not remove the Tank Valve from the Tank, doing so may cause serious injury or death.

Spyder MR3 Paintball Gun and Compressed Air Tank
Spyder MR3 Paintball Gun Electronics and Settings
Spyder MR3 Paintball Guns Battery Charging
Spyder MR3 Paintball Marker Velocity Adjustment
Spyder MR3 Disassemble Reassemble and Cleaning Internals
Spyder MR3 T-Cocking Removal
Spyder MR3 Anti Chop Eyes
Spyder MR3 Cup Seal Removal
Spyder MR3 Paintball Gun Schematics

How to get free paintball stuff. You have to know about free Target $500 gift card.
Tuesday, December 4, 2007

Spyder Electra DX Troubleshooting


ONE OR MORE OF THE FOLLOWING MAY CAUSE RECOCKING RELATED PROBLEMS:

a. The pressure in the tank is too low or too high.

b. Need lubrication. (See OPERATION GUIDE in P4)

c. #19A (striker o-ring) is damaged. Replace with new Kingman or Kingman-approved o-ring. (NOTE: the #19A O-ring cannot be substituted by a tank o-ring or a #9 o-ring).

d. Need to clean barrel and upper chamber or the receiver.

e. Paintball may be defective (i.e. expired, change shape)

f. #9 (bolt o-ring) is damaged or the o-ring has expanded or swelled. Replace with a new o-ring.

g. After ball breaks, remove all parts from UPPER chamber of receiver, wipe parts clean, and reassemble parts into receiver. Also make sure to clean barrel with squeegee.

Spyder Electra DX Helpful Hints

Always remove air tank before any disassembly of your marker. DO NOT remove #14 (valve body) unless specific valve body repairs are needed. If needed, remove valve body with a long, soft-tipped object such as the eraser end of a pencil. DO NOT remove the valve body with a screwdriver as it will damage the valve body and cause air leaks. (Note: #15 screw must be removed prior to taking out the valve body).

Air leaks are usually cause by a damaged valve body or damaged cup seal (#12). Replace with new valve body and/or cup seal if necessary.

To assure marker is assembled properly, follow the schematic drawing or place parts in order during disassembly. Parts assembled backwards or placed in the wrong order will cause marker to malfunction.

ELECTRONIC GRIP TROUBLESHOOTING

a. Check to make sure there is enough air pressure to fire the marker.

b. Battery may need to be recharged.

c. Specific troubleshooting questions may be answered by calling toll free at (888) KINGMAN or (626) 430-2300.

Spyder Electra DX Users Manual
Spyder Electra and Electra DX Parts List
Spyder Electra Charging Instruction and Specifications
Spyder Electra DX Recharging the Battery After Initial Use
Spyder Electra DX Digital LED Panel (D.L.P) Specifications and Operation Diagram

How to get free paintball stuff. You have to know about free Target $500 gift card.

Spyder Electra DX Digital LED Panel (D.L.P) Specifications and Operation Diagram


1. The D.L.P has one push key for adjustment and one LED Array for Mode Indicator, and two digits LED to display ROF.

2. For "MODE" indicator, the LED Indicator shows following functions: ( From left hand side to right hand side, the left hand side is the side near push key. )
(1). Battery Low
(2). SEMI
(3). Burst-3
(4). Burst-6
(5). FULL

3. For "R.O.F." display , the rate of fire can be adjusted from "05" to "13", that is the rate of fire will be ranged from 5 shots per second to 13 shots per second. But for "SEMI" mode, the "R.O.F" display will be fixed on "13" for reactive trigger response up to 13 shots per second.

4. When Power turns ON, the defaults will be Mode ="SEMI" and "R.O.F" = "13". All settings can be adjusted while power keeps ON. Any adjustments will be lost when Power turns OFF.

5. The "Battery Low" Indicator will keeps OFF during normal operations. When the capacity of battery dropped to about 1/3 of the battery full capacity, this indicator will be turn ON.

6. The D.L.P also equipped with a "LOCK" function. A short-circuit plug located on the internal circuit board serves this function. When this plug had been pulled out, the MODE will be locked to SEMI, and cannot be adjusted.

7. Operation Methods:
Press, Push and hold the key for over 2 seconds, then release the key.
Click, Push and then release the key. The duration should be less than 1 seconds.


NOTICE:
It is recommended that the battery be charged prior to use to ensure the maximum capacity if you leave the battery unused for over a week.

LIFE OF BATTERY
With the qualified Charger, and in normal use conditions, about 700 – 1000 chargerecharge cycles can be expected. This be varied depending on the type of use.

GENERAL MAINTENANCE
  1. Use compressed air to clean the coil set after each use (part no. #JE18C) to maintain performance.
  2. Beside step (1), cleaning should only be performed on the exterior of the E-Marker frame. Never submerge the E-Marker frame in any type of liquid for any reason. The electronics may become damaged or destroyed. Keep water or cleaning solution from entering the inside of the E-Marker frame. Solvents should not be used to clean any part of the E-Marker frame.
  3. Always use the appropriate tool to remove screws and other components of the EMarker frame.
  4. DO NOT DRY FIRE.

Spyder Electra DX Tournament Mode Setting
The Spyder Electra DX paintball marker circuit board – (Digital LED) part no. E29E also equipped with a "LOCK" function. A short-circuit plug (JE30B) located on the internal circuit board serves this function. When this plug had been pulled out, the MODE will be locked to SEMI, (single shot mode) and cannot be adjusted. Putting the lock switch (JE30B) back into the circuit board will enable the multi-mode functions. IMPORTANT! For optimal performance, Kingman recommends that an agitator loader or hopper be used in order to shoot at high rate of fire. Kingman also recommends to use JAVA CO2 Air Tank or High Pressure Air Tank and tournament grade paint.

Spyder Electra DX Users Manual
Spyder Electra and Electra DX Parts List
Spyder Electra Charging Instruction and Specifications
Spyder Electra DX Recharging the Battery After Initial Use
Spyder Electra DX Troubleshooting

How to get free paintball stuff. You have to know about free Target $500 gift card.

Monday, December 3, 2007

Spyder Electra DX Recharging the Battery After Initial Use


A fully charged battery will provide about 8000-12000 shots in normal use. The actual shots will depend on the Spyder Electra DX paintball markers and the type of use. Due to the characteristics of the NiMH battery, it won't be necessary to completely drain the battery before recharging it. So, you can charge the battery any time you want and the time needed to the full charge will depend on how much energy is left in the battery. The more energy left in the battery, the sooner it will achieve a full charge.


Spyder Electra DX paintball marker

Spyder Electra DX Operation Guide

  1. Put the marker on 'SAFE' by pushing the on/off switch to the right. The marker is now off. To power on the Spyder Electra DX paintball marker, push the on/off switch to the left. CAUTION: with the power on, the electronic circuit board is now powered on and ready to shoot.

  2. Cock the marker by pulling the Cocking Knob (#39D) rearward until it latches. Caution: if you let go before it latches, your marker may fire.

  3. Tighten the air tank until it is snug. If a leak occurs between the tank and the C/A adapter, replace the tank o-ring.

  4. Install a 7/8th vertical elbow with loader onto the direct feed. Fill the loader with .68 caliber paintballs only.

  5. With the safety off, fire the marker by pulling the trigger.

  6. Only use lubrication specifically designed for Spyder Electra DX paintball markers. To lubricate your marker, you will need to disassemble your marker (please note how parts are removed from marker as this will ease re-assembly). Remove the Disconnect Lock Pin (#23C) and the Quick Disconnect Pin (#23B). Hold down the Striker Plug (#23F/#23FA) and Thumb Adjuster (#2529 #2529A), as internal parts may be spring-loaded. As you pull the cocking knob out of the receiver, the Venturi-Cocking Bolt (2317) and striker (JE18A) will also be removed.

  7. Lubricate o-rings #9B and #19A with a few drops of paintball oil only.

  8. Re-assemble parts back into the Spyder Electra DX paintball marker. Note: when putting the Venturi-Cocking Bolt and striker back into the marker, you will need to apply pressure behind the bolt while Pushing the sear (#JE12) forward to its limit at the same time. (right now the battery side grip must be opened ) This will allow the bolt and striker to be properly installed back into the receiver.

  9. When you are finished shooting the Spyder Electra DX paintball marker, first, unload the marker of all paintballs (also see #10 below). NOTE: there may be a ball in the receiver; take a couple of shots in a safe direction to make sure that the barrel and receiver are empty. Second, put the barrel plug into the barrel. Put the safety on and slowly unscrew the air source tank. Caution: do not unscrew the tank valve from the tank. Doing so may cause serious injury or death.

  10. Empty the hopper or remove the hopper off the marker to stop the flow of paintballs in the marker.

  11. Adjusting the regulator – To adjust the regulator, turn the regulator screw (#35E) clockwise to increase the pressure (500~600 psi is recommended). When your nitrogen or compressed air system is properly installed to the C/A adapter (#2535, #2535C), the recommended output pressure of the air system should be at 750 ~ 850 psi.

  12. Adjusting the trigger pull – You may adjust the trigger pull on your marker by turning the Trigger Adjust Screw (JE31D). Follow these steps to access the trigger adjust screw:

    1. Remove the two frame screws (#16/#16D) that connect the grip frame to the receiver.

    2. Look inside the trigger frame to find the Trigger Adjust Screw. This is a small screw connected to one end of the trigger.

    3. Turn the Trigger Adjust Screw counterclockwise to turn the screw slightly out of the trigger. This will shorten the trigger pull.

    4. CAUTION: Do not over adjust and shorten the trigger pull too much as this will cause the trigger to be too sensitive and function improperly.

    5. Reassemble Spyder Electra DX paintball marker.

Spyder Electra DX Users Manual
Spyder Electra and Electra DX Parts List
Spyder Electra Charging Instruction and Specifications
Spyder Electra DX Digital LED Panel (D.L.P) Specifications and Operation Diagram
Spyder Electra DX Troubleshooting

How to get free paintball stuff. You have to know about free Target $500 gift card.

Spyder Electra Charging Instruction and Specifications


The battery to be used with your frame is a specially designed 9.6Volt NiMH Battery. To maximize the life of the battery, please read the following instructions before use.

CONNECTING THE BATTERY
Remove the left Electra DX grip cover (part#JE32A). The battery terminal is located to the left of the circuit board. Attach the battery to the battery connectors by aligning the + (positive) on the battery connector to the + (positive) on the battery.

THE CHARGER FOR THIS BATTERY
This charger is specially designed for a 9.6Volt rechargeable battery. Five types of chargers will be available from your Kingman Dealer:

  1. Java Rapid Standard Indoor 110v A/C Charger (#JE1026)
  2. Java Rapid Car Charger (#JE1022)
  3. Java Standard Indoor 110v A/C Charger (#JE1024)
  4. Java Standard 2B Indoor Charger (#JE1023)
  5. Java Standard Indoor 220v A/C Charger (JE1025)

Using a Rapid Charger it will take approximately one and a half hours to fully charge the JAVA 9.6v battery. It will take approximately 5-6 hours for the standard charger.

WARNING
Using other unspecified batteries or chargers can cause damage to the circuit board. This will void all warranty and liability from Kingman. Please use only Java 9.6 volt NiMH rechargeable battery (Part #JE1015) and Java chargers

Spyder Electra DX Users Manual
Spyder Electra and Electra DX Parts List
Spyder Electra DX Recharging the Battery After Initial Use
Spyder Electra DX Digital LED Panel (D.L.P) Specifications and Operation Diagram
Spyder Electra DX Troubleshooting

How to get free paintball stuff. You have to know about free Target $500 gift card.

Spyder Electra and Electra DX Parts List


CO2/HP AIR TANK WARNING
VALVES MUST BE INSTALLED OR REMOVED ONLY BY QUALIFIED PERSONNEL.
BOTTLE MUST BE RETESTED SEE CO2/HP TANK LABEL FOR RETEST DATE!
Improper use, filling, storage or disposal of this cylinder may result in death, personal injury and property damage.
This cylinder must be filled only by properly Trained personnel in accordance with CGA Pamphlets P.1 and G-6.3 available from the Compressed Gas Association www.CGANET.COM
Do not over pressurize. Do not expose pressurized cylinder to temperatures in excess of 130 degrees F.
Do not expose cylinder to corrosive materials and do not clean with caustic cleaners.
Do not alter this cylinder in any way.
Cylinders heated to a temperature of 250 degrees For more must be condemned or requalified in accordance with test defined in CFR-49.
Keep cylinder out of reach of children.
The valve should NEVER be detached from the canister. Should this occur, please seek assistance from a trained airsmith immediately.
This tank is intended for paintball use only.

Spyder Electra and Electra DX Paintball Marker Parts List


01Spyder Barrel Plug
02KBElectra 13.5" Barrel (Black)
02KCElectra 13.5" Barrel (Blue)
04GAMini Detent Cover (Black)
05AM4 x 6 Screw (Black)
05BM4 x 6 Screw (Silver)
05CDirect Feed Screw
07M5 X 14 Screw w/ Washer
09O-Ring #015 80D
10AValve Spring
11Cup Seal Guide
12Cup Seal
13Valve Pin
14Valve Body
15Valve Body Screw
16M5 x 12 Screw (Black)
16DM5 x 12 Screw (Silver)
2317Electra Venturi Cocking Bolt
RF17ARetaining Screw
RF17BRetaining Spring
RF17CRetaining Ball
JE18AStriker
19AStriker O-Ring
20Barrel O-Ring (Black)
21Bolt Pin
2504Direct Feed (Black)
2504ADirect Feed (Blue)
2506Electra Receiver (Black)
2506AElectra Receiver (Blue)
2508Vertical Adapter (Black)
2508C*Vertical Adapter w/ Gauge (Blue)
2508NLow Pressure Chamber (Black)
2508NALow Pressure Chamber (Blue)
23FStriker Plug (Black)
23FAStriker Plug (Silver)
2535C/A Adapter (Black)
2535C*C/A Adapter w/ Regulator (Blue)
2544FMini Fore Grip (Black)
2544FAMini Fore Grip (Blue)
2544HModel S Expansion Chamber (Pewter)
2544HAModel S Expansion Chamber (Silver)
21Bolt Screw
22BM4 X 8 Screw w/Washer (Black)
23BQuick Disconnect Pin
23CDisconnect Pin Lock
24ASight Rail Screw w/ washer
25Striker Spring
26AStriker Buffer
27Striker Spring Guide
27AFlat Disc
29BLock Screw
E29ELED Circuit Board
2529Thumb Adjuster w/ Screw (Black)
2529AThumb Adjuster w/ Screw (Blue)
33FCompact Nut Screw
35DSpyder Gauge
35FRegulator Lock Screw
2535KElectra Drop Forward (Black)
2535KAElectra Drop Forward (Blue)
36C5/32" X 7/8" Screw (Silver)
36D5/32" x 5/8" Screw (Black)
36E5/32" X 7/8" Screw (Black)
37AFilter O-Ring
37BAir Filter
37CDisconnect O-Ring #011 (Black)
37DPlastic Washer
2537Electra Disconnect Hose
39DElectra Striker Knob
2541Electra Spare Parts Kit
42Male To Male Adapter
42FC/A Male Adapter
2547Electra Sight Rail (Black)
2547AElectra Sight Rail (Blue)
49Trigger Roll Pin
49BSecondary Sear Roll Pin
49CTouch Switch Roll Pin
E24On/Off Switch with Wiring Harness
E24ABattery Harness
E33On/Off Screw (M2 x 6 Screw)
E40Straight Elbow - 2 3/4"(Clear)
JE1015Java 9.6v Rechargeable Battery
JE12Trigger Sear
JE18CCoil Set
JE18ECoil Set Screw
JE26Charge Pin
JE27Touch Switch
JE29Circuit Board Screw
JE30BTournament Lock Switch
JE31CTrigger
JE31DTrigger Adjust Screw
JE31ESear Spring
JE31FTrigger Spring
JE32Grip Cover (Black)
JE32AGrip Cover (Clear)
JE33CGrip Cover Screw (Black)
JE33DGrip Cover Screw (Silver)

* For Electra DX Model Only.

Spyder Electra DX Users Manual
Spyder Electra Charging Instruction and Specifications
Spyder Electra DX Recharging the Battery After Initial Use
Spyder Electra DX Digital LED Panel (D.L.P) Specifications and Operation Diagram
Spyder Electra DX Troubleshooting

How to get free paintball stuff. You have to know about free Target $500 gift card.

Spyder Electra DX Users Manual


CAUTION
This Spyder Electra DX paintball marker is NOT a toy. It can cause serious injury or death.
Recommend at least 18 years of age to purchase this product.
Install a barrel plug in the barrel when not actually playing.
All persons using this product, or within range while this product is being used, must wear eye and face protection specifically designed for paintball.
Never shoot a person who is not wearing proper protection.
Treat every Spyder Electra DX paintball marker as if it were loaded.
Never look down the barrel of the Spyder Electra DX paintball marker.
Keep the Spyder Electra DX paintball marker on safe until ready to shoot.
Always remove gas source before disassembly.
Fire only 0.68 caliber paintballs from this product.
Read this manual and air system warning before using this product.
Transfer this instruction manual upon change of marker ownership.

Spyder Electra DX


IMPORTANT
Firing velocity may vary according to altitude and climate conditions.
BEFORE using your Spyder Electra DX paintball marker in play, you must always first perform a "SAFE VELOCITY TEST". This can only be accomplished by using a testing device called a "Velocity Chronograph" and can be performed by the dealership where you purchased this product or at a local paintball playing field.
NOTE: This product is intended to be used at a velocity no greater than 300 feet per second (FPS).
Recommended velocity is 280 FPS or less.
This product is NOT intended to be used at any distance less than 25 feet.
This Spyder Electra DX paintball marker may have excess gas after removal of the tank. Please remove all paintballs and discharge the remaining gas safely.

Spyder Electra and Electra DX Parts List
Spyder Electra Charging Instruction and Specifications
Spyder Electra DX Recharging the Battery After Initial Use
Spyder Electra DX Digital LED Panel (D.L.P) Specifications and Operation Diagram
Spyder Electra DX Troubleshooting

How to get free paintball stuff. You have to know about free Target $500 gift card.